
.png)

This section covers the FL Studio desktop and basic workflow. In short, FL Studio allows you to load instruments and samples, play these live or manually enter the note data, record external sounds (from a microphone for example) and play the whole mix back through the 99 channel mixer (adding effects). The completed project can be saved in .flp or .zip formats and/or exported to .wav, .mp3 or .ogg audio.
This section covers:
- The main windows.
- Adding instruments to a project.
- Composing & sequencing.
- Arranging & editing songs.
- Mixing & levels.
- Exporting audio & saving.
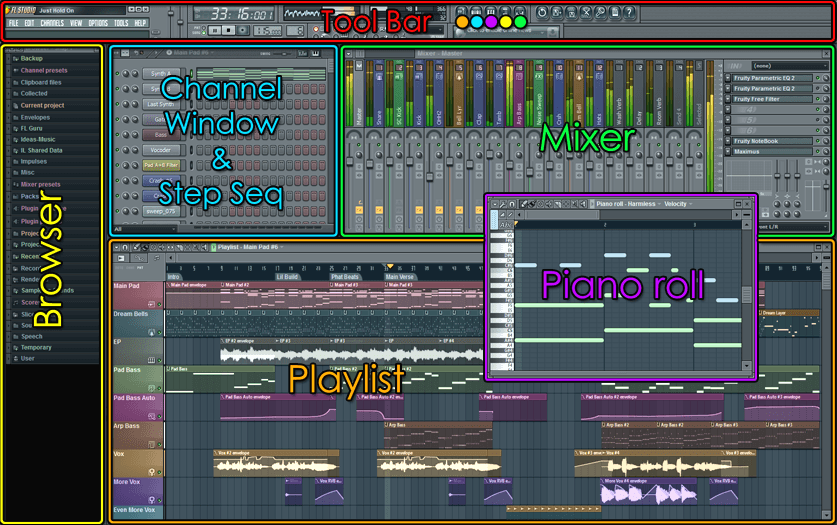
Main Windows
The FL Studio desktop is based on a number of windows, most of these are movable (with overlap), resizable, zoomable and switchable so if a window isn't visible open it using the Shortcut toolbar (or the function keys as noted in brackets). The main windows involved in FL Studio music creation are - Channels ( F6), Piano roll (F7). Mixer ( F9) and Playlist ( F5). The Browser ( F8) is used to access audio files & presets from within FL Studio (see the File setting options for adding directories on your PC to the Browser). NOTE: If you ever need to reset the position of all windows to their default use (Ctrl + Shift + H)
Workflow
Once you have mastered the FL Studio interface, the next step is to learn the procedure for creating music - the FL Studio 'workflow'. The five main activities involved are outlined below:
1. Instruments
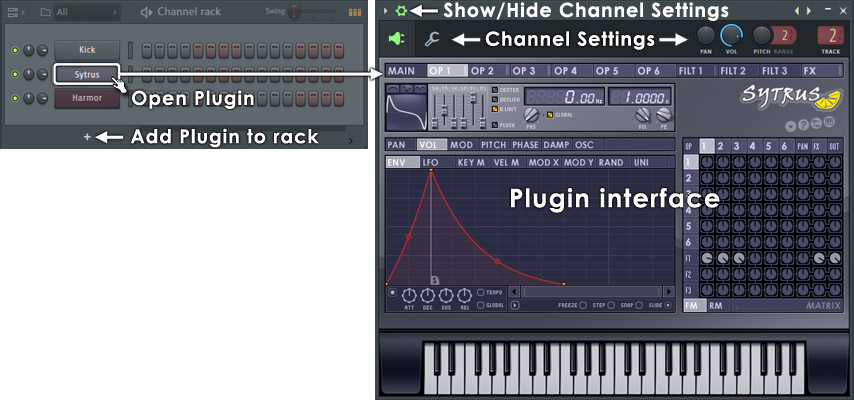
- Instruments - Instruments make the sounds used in a song and are loaded in the Channel Window. In the screen-shot below, the instrument interfaces are minimized and are accessed by clicking on the Channel buttons, down the left side of the window. Instruments generally fall into two types, software synthesizers that create audio using an internal 'synthesis engine' or sample players that play back 'audio recordings' such as drum loops, percussion samples or instrument samples.
- There are several ways to load a new instrument:
- Add a new instrument channel - Use the Channels Menu > Add One > menu.
- Replace an existing instrument channel - Right-click on a Channel button and select 'Replace >' from the pop-up context menu.
- Drag items from the Browser - Drag a plugin preset or samples/loops from theBrowser to the Channel window OR a Mixer track and the Channel will be loaded and routed to that Mixer track.
- Use the plugin picker - Open the Plugin Picker database (Ctrl + F8) and double-click an instrument OR drag it to the Channel Window OR Mixer track and the Channel will be loaded and routed to that Mixer track.
- In the case of samples & loops you can also drag these from the Browser to the Playlist (see below). When you drag a sample to the Playlist an Audio Clip instrument is automatically added to the Channel window. Alternatively you can Right-click the sample in the Browser and 'send' it to one of the instruments in the pop-up list.
- Add your own directories to the Browser with the F10 > File settings dialog.
- To open an instrument interface Left-click on the Channel button.
- Think of the Channel window as a rack of synthesizer/sampler modules that can be routed to any one of the 99 Mixer Tracks using the Channel settings FX (Mixer Track Selector).

2. Composing & sequencing
- Composing - Musical notes and chords can be played live via a controller keyboard or entered manually in the Piano roll (Right-click the Channel buttons to open the Piano roll) OR use the default Step Sequencer to trigger percussion samples. There is a Step Recording option on the Recording Panel also.
- When editing patterns, make sure you are in Pattern Mode so that when you press play the currently selected pattern is played.
- To the right of each instrument button in the Channel window is either a step-sequencer display (rows of squares) or a mini-preview of a Piano roll (green lines).
- Step Sequencers and Piano rolls are interchangeable for each Channel.
- New instruments start with an empty Step Sequencer pattern by default. Step Sequencers andPiano rolls hold the note data only for the instrument channel they are associated with.
- Step-sequencer 'steps' are activated by by Left-clicking the squares to turn them on, or Right-clicking to turn them off (great for percussion programming).
- To open an existing Piano roll, Left-click directly on the mini-preview window.
- Changing patterns - Left-click hold and slide up/down on the Pattern Selector (shown above) to change the pattern number and work on a new pattern.
- Up to 999 unique patterns can be created. The complete stack of channel instruments and their Step sequence/Piano roll data is a single pattern. In the example above, Pattern '1' consists of aHarmor Channel being played by a Piano roll and a Step Sequence Hat Channel. In the example below Pattern 2 consists only of step-sequence data playing the Kick & Hat channels.
- As you step through the patterns with the Pattern Selector, the appearance of the channel window will change to reflect the note data associated with each pattern.
- The length of each pattern can vary and is determined by the number of bars spanned by the longest data in any one of the channels.
- Piano rolls may be of any length. The 'LCD' window showing '--' in the top left corner of the Channel window changes the number of Steps in the pattern (4 to 64 are possible).
3. Arranging & editing
- Arranging - To use the Playlist you will need to have at least Fruity edition.
- Arranging with 'Producer edition' - Use the Playlist to hold three types of data, use the Clip source selector (shown below) to select:
- Pattern Clips (notes) - Patterns generally hold note data for sequencing Plugin instruments, although they can also contain Automation Event data.
- Audio Clips (audio/loops/samples) - If an Audio Clip already exists, it can be selected from the 'Clip source selector', otherwise you can drag sample/loop/audio files from theBrowser directly into the Playlist. Add your own directories to the Browser with the F10 > File settings dialog.
- Automation Clips (control movements) - Automation Clips move knobs and controls on the FL Studio interface and plugins. To create an Automation Clip Right-click on an interface control and select 'Create automation clip'.
- Arranging with 'Fruity Edition' - that only has access to the Pattern Clip type that holds note data from Stepsequences or Piano rolls & Event Automation. The length of a Pattern Clip will be determined by the length of the data in it, you are not restricted.
- Audio - Since Audio Clips are not available in Fruity Edition, to insert track-length audio you can trigger a Sampler Channel from a Pattern using the Piano roll to control the duration of the sample. The note C5 will play the audio at the original pitch.

- An alternative Clip selection method is to Right-click a tab of the Playlist Clip Focus selector to show Clips of the desired category.
- Once a Clip is selected, select Draw (Pencil) or Paint (Brush) mode Left-click on a blank area of the Playlist. Dragging in Brush mode will repeat the Clip as you drag horizontally.
- Once placed, Pattern Clips can be clicked + dragged around (horizontally or vertically) by the name-bar that runs along the top of the clip. The way the clip moves will depend on the Playlistsnap settings and zoom level.
- The Playlist Clip Tracks can be named, colored, moved up/down or muted. These functions are accessed by Right-clicking on the Name area at the start of each track.
- You can place any Pattern Clip in any Clip Track, or any number of different clips in the same track. Clip tracks are just universal holding lanes for any and all data types.
- Playback - Make sure you are in Song Mode so that the patterns are played from the Playlist. Otherwise, you will play only the selected pattern. There are Play buttons on the top of the Channel window and Playlist, so you can also initiate a Pattern or Playlist play-back that way.
- FL Studio is not limited to pattern-based sequencing, you can also enter an unused Pattern Clip into the Playlist and play song-length data (patterns). Thus, FL Studio has the flexibility of being either a 'track-based' sequencer, a 'pattern-based' sequencer, or a combination of the two.
4. Mixing
- Mixing - Sound from the instrument channels is routed (using the Channel settings FX send, see the Note below) through the Mixer, where levels are set and Effects (FX) such as reverberation (reverb), chorus and delay are added.
- See the page Levels, Mixing & Clipping for more detailed Mixing advice, and in particular the section Making tracks louder! (and good) for some tips on getting a great 'commercial' sound.
- Almost all aspects of mixing are automatable, so fader movements and knob changes become part of the overall performance.
- The Mixer is also the place where external audio from a microphone, guitar or synthesizer can be recorded along with the internal instruments.
- The recorded sound is displayed in the Playlist as an Audio Clip.

- NOTE: Routing Instrument Channels to Mixer tracks - The most efficient way to route one or more Channels to Mixer tracks is to:
- 1. Left or Right-click the Channel Selector LED's to the right side of each Instrument Channelyou want to route (Right-clicking allows multiple selections).
- 2. Right-click the target Mixer track and select 'Link selected channels > to this track' from the pop-up menu. OR use 'Link selected channels > starting from this track' to assign multiple Channels to multiple Mixer tracks.
5. Exporting audio
- Exporting/Rendering - The final mix is exported from FL Studio to a .wav, .mp3 or .ogg file format by selecting the export option from the file menu in a non-real time process called rendering.
- CD? If you want to make an Audio CD you need to render to 16-Bit, 44.1 kHz .wav files. FL Studio does not burn audio CDs so you will need to use a 3rd party Audio CD burning application.


0 comments:
Post a Comment